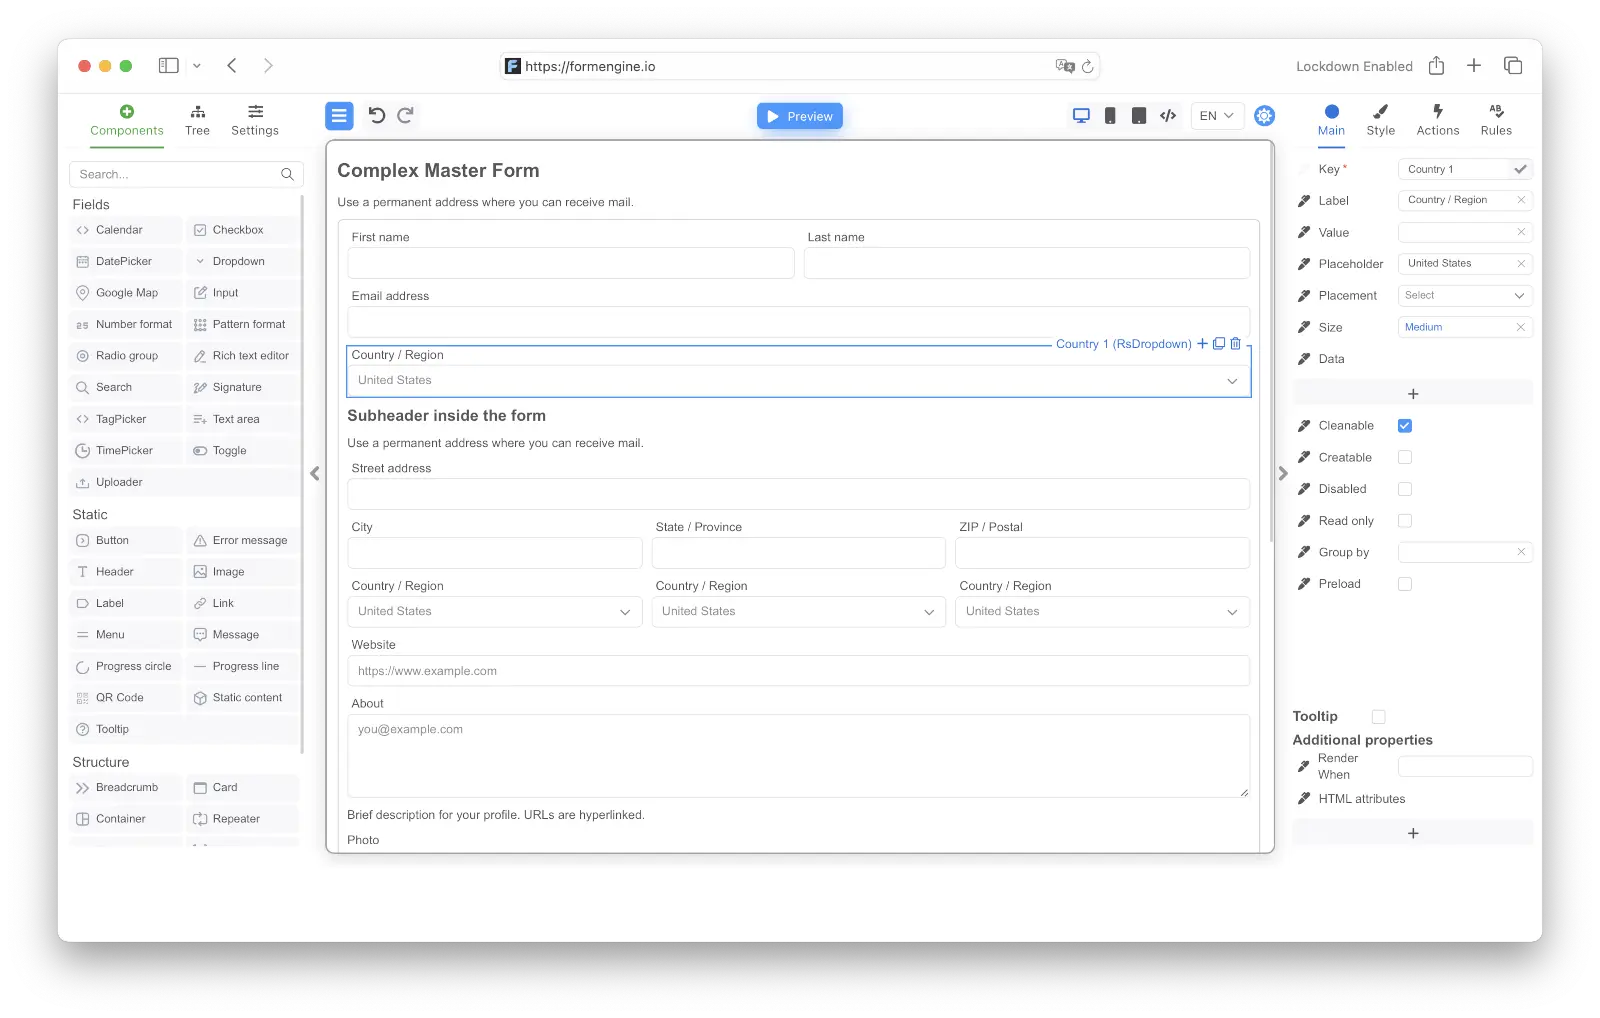
FormEngine Designer is the visual drag-and-drop form builder from the FormEngine suite. It lets non-technical users create and edit React forms without writing code — and outputs the same JSON schema that FormEngine Core renders in production. Embed Designer directly into your React application to give product teams, admins, or end users the ability to build forms visually. Designer works with any UI component library (Material UI, Ant Design, shadcn/ui, or your own components). If you don’t have a component set, a ready-made library based on React Suite is included.
FormEngine Designer — drag-and-drop visual form builder with component panel, form canvas, and property editor

Why Designer instead of form.io, SurveyJS, or Typeform?

FormEngine Designerform.ioSurveyJS CreatorTypeform / JotForm
Deploymentnpm package, self-hostedPlatform with backend, hostednpm package, self-hostedSaaS only
EmbeddingReact component, no iframeIframe or React wrapperReact/Angular/Vue componentIframe
White-labelFull — your styles, your brandingLimitedFullNo
Data ownershipYour infrastructure, you controlTheir servers (or self-hosted enterprise)Your infrastructureTheir servers
RuntimeFree MIT CorePaid platformPaid renderer for commercial useSaaS subscription
Vendor lock-inJSON output, MIT runtimePlatform-dependentOwn format + rendererFully locked
FormEngine Designer is for teams that want a visual form builder inside their own product, with full control over data, styling, and infrastructure.

Key features

UI-Agnostic Components

Works seamlessly with any UI library (MUI, Ant Design, shadcn/ui and others)

Pre-Built React Suite

Ready-to-use component library – @react-form-builder/components-rsuite

Framework Support

Built-in Validation

Pre-configured validation with Zod, Yup, and more

Responsive Layouts

Forms that automatically adapt to all screen sizes

Custom Actions

Add interactive logic through custom JavaScript
Additional capabilities:
  • Multi-Database Support: Compatible with MySQL, PostgreSQL, MongoDB, SQLite, and more.
  • Localization - Powerful capabilities for localizing forms using Fluent.js.
  • Dynamic Properties: Real-time component changes with MobX-powered reactive properties.
  • Flexible Storage: Store complete form definitions as JSON or programmatically generate forms via code.

Quick start

Let’s create a sample form application from scratch.
1

Create the application and install dependencies

npx create-vite formbuilder-app --template react-ts
cd formbuilder-app
npm install @react-form-builder/core @react-form-builder/components-rsuite
2

Add a form to the page

Each form is just JSON with a description of the form. The library takes care of form rendering and event handling.Each form element is a component described by a unique key and type, and a set of properties. You can create form’s JSON using the builder:
const simpleForm = buildForm({errorType: 'RsErrorMessage'})
  .component('container', 'RsContainer')
  .style({flexDirection: 'row'})
  .children((builder) =>
    builder
      .component('firstName', 'RsInput')
      .prop('placeholder', 'Enter your first name')
      .prop('label', 'First Name')
      .validation('required')

      .component('lastName', 'RsInput')
      .prop('placeholder', 'Enter your last name')
      .prop('label', 'Last Name')
      .validation('required')
  )

  .component('birthDate', 'RsDatePicker')
  .prop('label', 'Birth Date')
  .prop('oneTap', true)
  .validation('min').args({value: '1900-01-07T12:25:37.000Z'})

  .component('submit', 'RsButton')
  .prop('children', 'Submit')
  .prop('color', 'blue')
  .prop('appearance', 'primary')
  .event('onClick')
  .commonAction('validate').args({failOnError: true})
  .customAction('onSubmit')
  .json()
Then render the form with FormViewer. It is necessary to pass the getForm function to get the JSON of the form and the view property, this is the set of components for rendering the form. In this example, we use viewWithCss for React Suite.
live
function App() {
  const simpleForm = useMemo(() => {
    return buildForm({errorType: 'RsErrorMessage'})
      .component('container', 'RsContainer')
      .style({flexDirection: 'row'})
      .children((builder) =>
        builder
          .component('firstName', 'RsInput')
          .prop('placeholder', 'Enter your first name')
          .prop('label', 'First Name')
          .validation('required')

          .component('lastName', 'RsInput')
          .prop('placeholder', 'Enter your last name')
          .prop('label', 'Last Name')
          .validation('required')
      )

      .component('birthDate', 'RsDatePicker')
      .prop('label', 'Birth Date')
      .prop('oneTap', true)
      .validation('min').args({value: '1900-01-07T12:25:37.000Z'})

      .component('submit', 'RsButton')
      .prop('children', 'Submit')
      .prop('color', 'blue')
      .prop('appearance', 'primary')
      .event('onClick')
      .commonAction('validate').args({failOnError: true})
      .customAction('onSubmit')
      .json()
  }, [])

  const getForm = useCallback(() => simpleForm, [simpleForm])

  const actions = useMemo(() => {
    return {
      onSubmit: (e) => {
        // submit the form to the backend
        alert('Form data: ' + JSON.stringify(e.data))
      },
    }
  }, [])

  return <FormViewer
    view={viewWithCss}
    getForm={getForm}
    actions={actions}
  />
}
Modify the contents of the src/App.tsx file as in the example above.
3

Run the application

In the terminal, run:
npm run dev
Open your browser and go to http://localhost:5173 (your port may be different). You should see the form we created.
Form example
You can click on the Submit button without filling out the form, and you will see an error message.
Form example with validation error
If you fill out the form and click Submit, you will see an alert with the form data.
Form example with submitted data

Creating a form using Designer

You need a commercial license to use FormEngine Designer in production. Core (form rendering) is always free.
Creating forms using JSON may not be as convenient as creating them visually in the Form Designer. Let’s run the Form Designer locally. To do this, it is enough to install the package with the designer and connect components to it.
npm install @react-form-builder/designer @react-form-builder/components-rsuite
In the simplest configuration, the FormBuilder component has one mandatory view property, a visual description of the components. We will use the ready-made React Suite, you can use your own components.
src/Designer.tsx

/**
 * @returns the Designer element.
 */
export const Designer = () => {
  return <FormBuilder view={builderViewWithCss}/>
}
Below is an example of how to connect the form storage to the designer. A separate tab for managing forms and a save button appear in the designer.
Designer with built-in form storage

const formStorage = new IndexedDbFormStorage('example-db', 'example-store')

function MyDesignerApp() {
  const [ready, setReady] = useState<boolean>(false)

  useEffect(() => {
    formStorage.init({
      example: buildForm().json()
    }).then(() => {
      setReady(true)
    }).catch(console.error)
  }, [])

  if (!ready) return null

  return <FormBuilder view={builderViewWithCss} formStorage={formStorage} formName="example"/>
}
When you launch the Designer, you’ll see the visual form builder interface:
FormEngine Designer interface
Now you can create a form right on the page, customize components, and more. For a more complete example, see the link.

Designer Package

@react-form-builder/designer on npm

Core Runtime

@react-form-builder/core on npm

Source Code

FormEngine GitHub repository

Pricing & Licensing

Designer commercial licensing

Further reading

Styling Components

Learn how to style with CSS

Validation

Add validation rules to forms

Form Storage

Connect form storage to Designer

Next.js Integration

Use Designer with Next.js

Remix Integration

Use Designer with Remix

CDN Installation

Use without any framework
If your use case is runtime-only and fully open-source, start with FormEngine Core and add Designer later.
Last modified on April 16, 2026